
Today, Joan is sharing how to Find Photos and Digital Assets using Adobe Lightroom.
This tutorial is demonstrated in Lightroom Classic CC but many of the instructions will work in other versions of Lightroom
Find Photos and Digital Assets using Adobe Lightroom
Introduction
In this tutorial you will learn:
- How to IMPORT photos and digital supplies into Adobe Lightroom from a computer or external hard drive.
- How to add KEYWORDS to images to make them easily searchable.
- How to create COLLECTIONS of your photos and digital supplies.
1. Download Assets
Download photos or DigitalART supplies saved to your computer or external hard drive.
- You may have photos on your phone or SD-Card.
- You can move these images to your computer and add to Adobe Lightroom at the same time.
- See this Adobe LightRoom Photo Organization tutorial.
2. Open Lightroom
Double Click on the Lightroom Classic CC icon on your desktop.
- Importing photo involves bringing photos from an external device to your computer.
- Photos and/or DigitalART supplies already saved to your computer can also be added to the Lightroom Catalog.
- Create a separate catalog for your digital assets and photos or post them together – Note that it can be less confusing to have a separate catalog.
- You can also open a previous catalog and add photos.
Note.
- If you have only one catalog then just opening Lightroom will open that catalog.
- If you have multiple catalogs, navigate to the saved catalog and click to open.
- If you launch Lightroom, and you get the wrong catalog, click on File> Open Recent and then click on the catalog you want to open.
For demonstration purposes, I am using my Scrapbooking Supplies Catalog.
3. View and Import Images
Understanding the navigation of the catalog.
- Once you open the catalog click on Import.
- Go to the left side where the files are listed.
- Look for the files you want to open in the File Hierarchy.
- Click on the file to reveal a visuals of a product in the middle section.
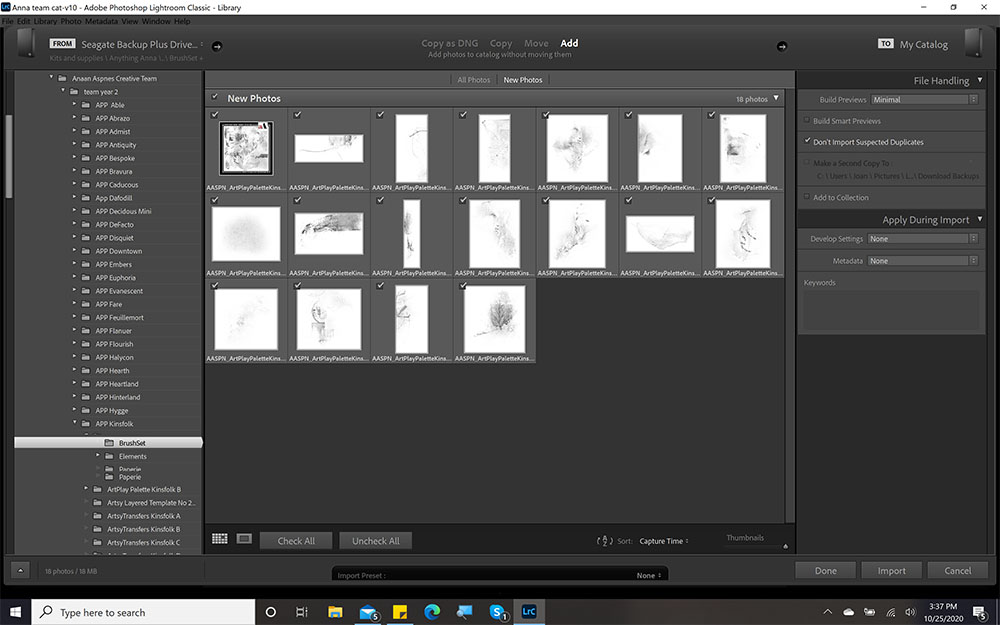
Note.
- Uncheck the box of images you do NOT want to have in your catalog.
- Click on the ‘check mark’ which appears in the upper right hand corner of each photo.
- For example, I do not import preview images.
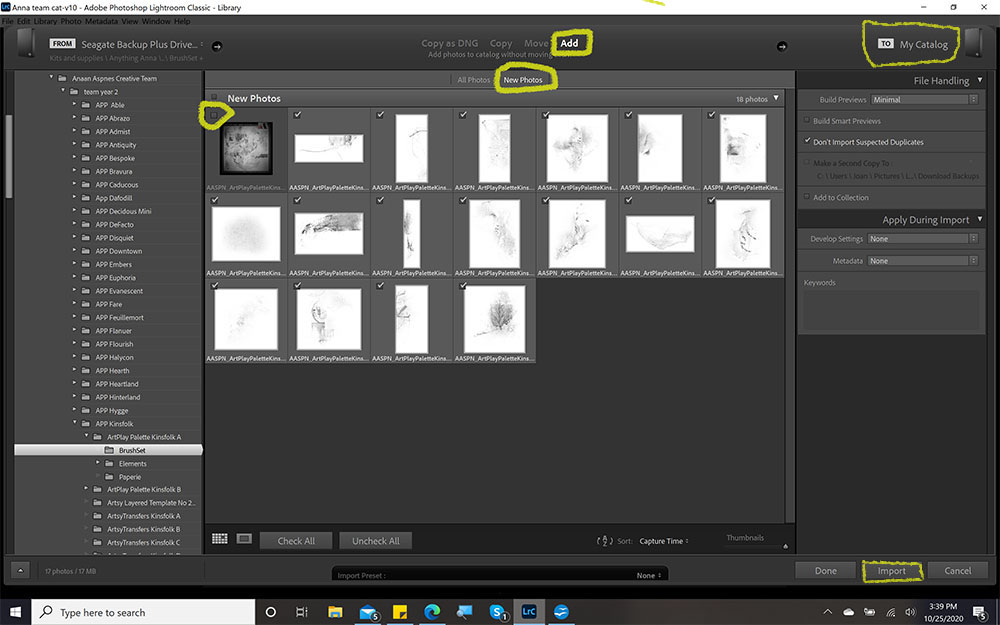
See ‘All Photos’ and ‘New photos’ in the Options Bar at the top of your screen.
- If it is the first time you are import from this folder, then you might want to check All Photos.
- If you are adding new photos to the catalog then check New Photos.
- Click on Add if it is not already highlighted.
See ‘To My Catalog’ in the left hand column.
- Click on Import (lower right) and Lightroom will create previews to be viewed in the Library Module.
- This may take a bit of time – In the upper left corner will see a bar moving to the right and disappears when finished.
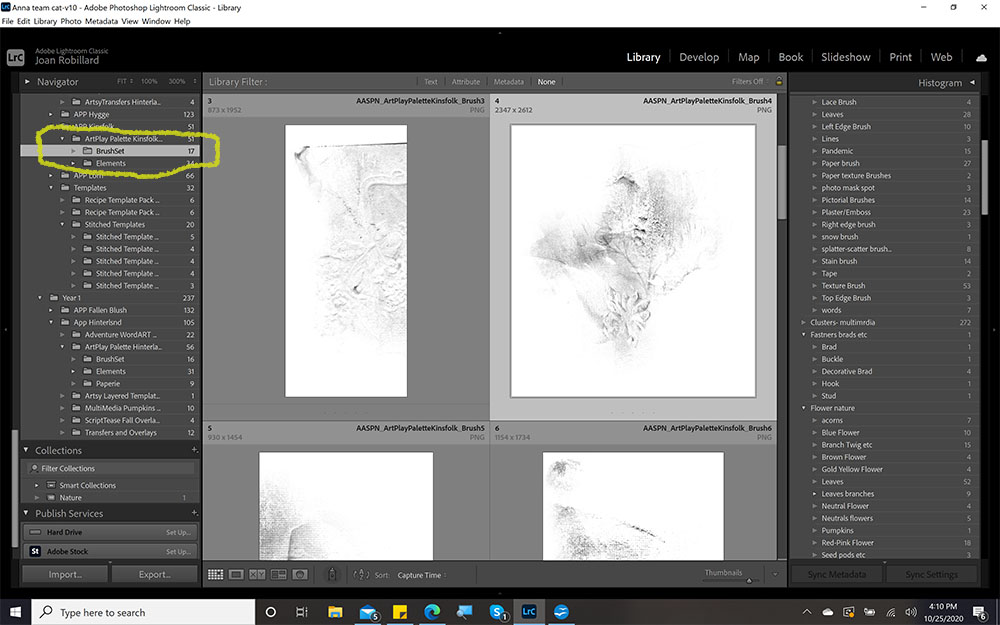
- In the far left column, you’ll be able to access the same File Hierarchy making it easier to find the files.
- Click on any file the photos to view the images.
Note. The photos will remain in their current saved location, and a preview for the catalog is created ONLY.
4. Create Keywords
Keywords are assigned to the images to make them easier to locate.
Think about the keywords you are most likely to use with your photos and products.
- For photos, consider using the names of people you want to identify in your photos, locations, events, and/or themes.
- For products, identify by product type, motif or color.
Note.
- Try not to add 10 or 15 keywords to every photo or product – You want to keep it simple with just a couple of key words..
- The goal is to spend more time creating digital layouts as opposed to adding keywords.
To add a keyword:
- Click on a photo/product to highlight.
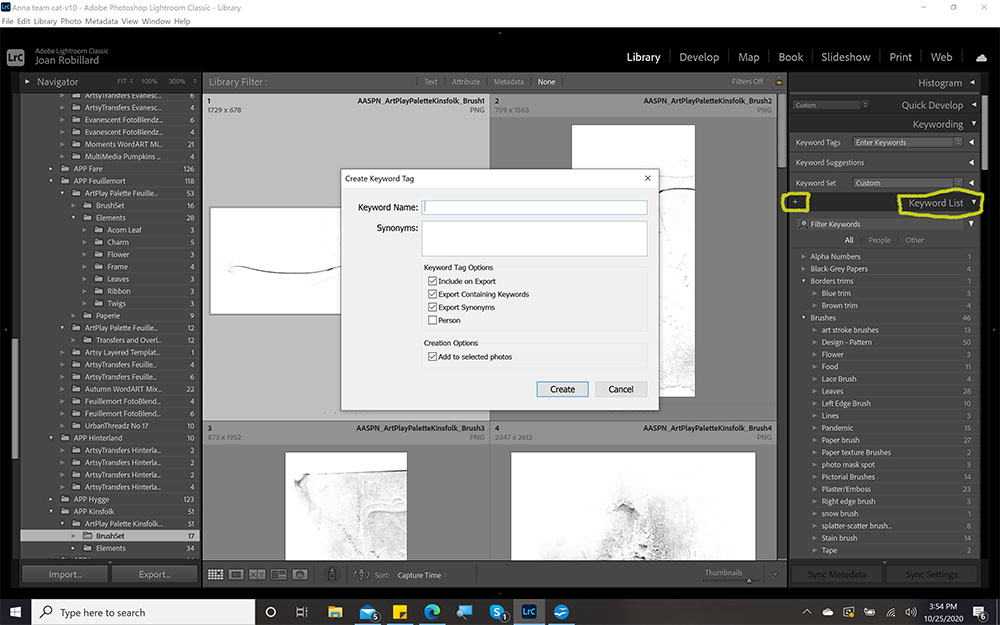
- Find the ‘+’ and ‘-‘ signs in the Keyword List in the right hand column.
- Click on the ‘+’ sign and to activate a ‘pop-up’ box.
- Type the keyword in the box after Keyword Name.
- You can also add Synonyms in the next box, but again, keep it simple.
There are a few rules:
- Keywords CAN have spaces e.g. Blue Paper
- Commas, Semicolons, and Pipes (|) are NOT allowed as they have a special use.
- Keywords CANNOT end with an asterisk(*).
- Keywords CANNOT begin or end with a space.
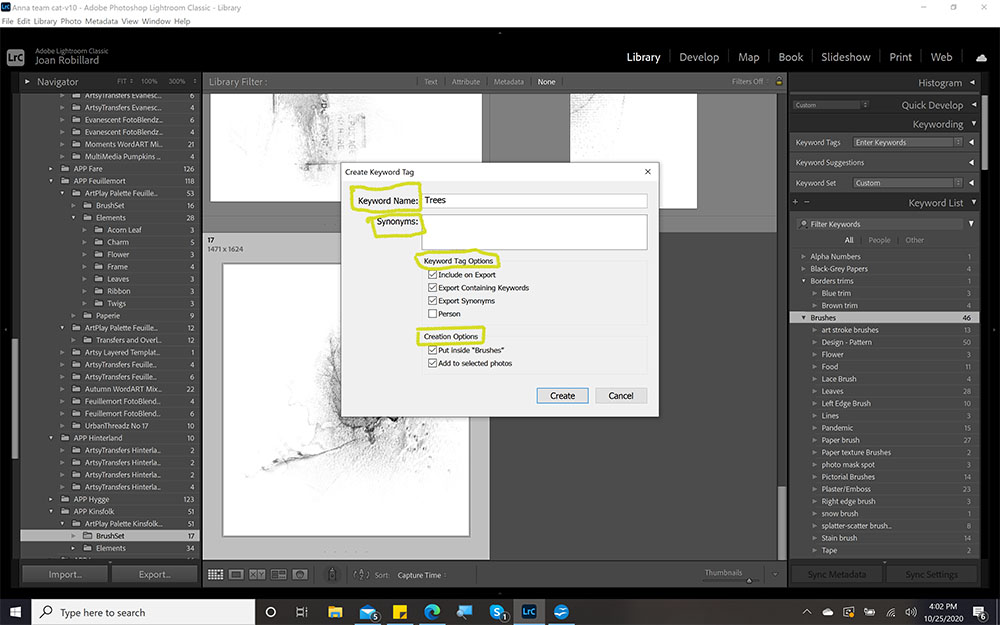
Other notes.
- Keyword Tag Options may be helpful if you are sharing photos with others, using the same keywords such as those found in a commercial use products
- Creation Options automatically defaults to the last keywords you highlighted and is helpful if you are using keywords within keywords i.e. sub-keywords e.g. For ‘Brushes’ you might want categorize using sub-keywords, such as ‘Stain’ or ‘Texture’.
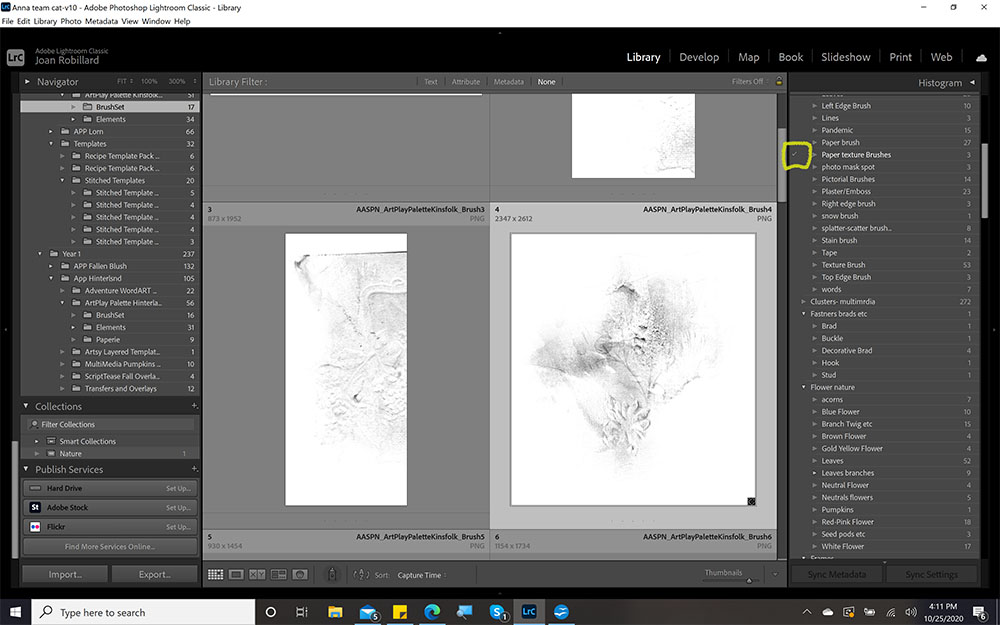
- You can select multiple images while applying NEW keywords.
- If have already defined a keyword, select the images and click on the box in front of the keyword.
Note. You will not see the box until you select a photo.
5. Creating Collections
- You can also organize your assets using Collections.
- For example, I use this for all my ‘Black and White’ photos as well as ‘themed’ DigitalART supplies.
- Create a new collection in the same way as you create a new Keyword.
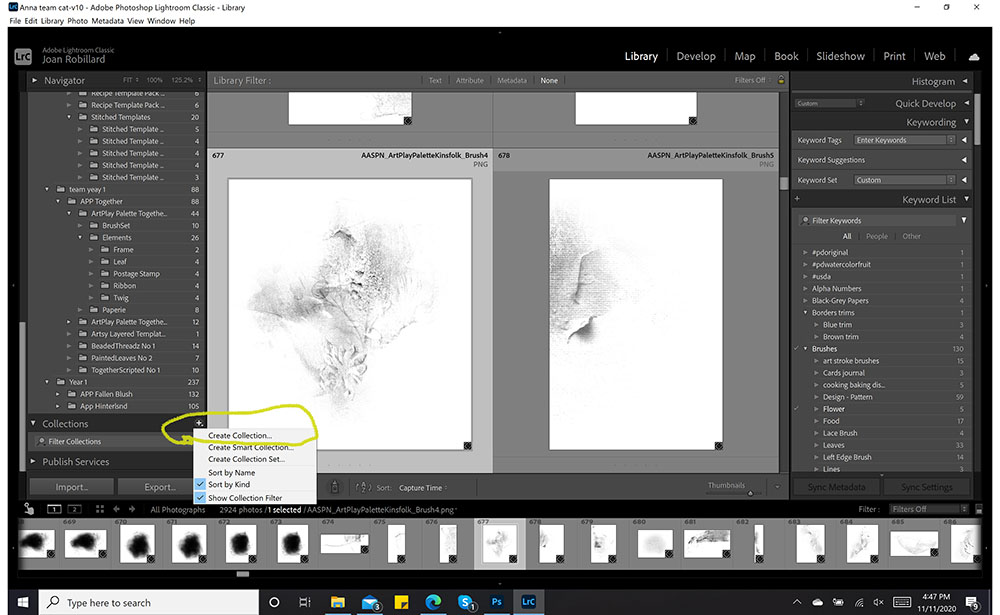
- Find Collections in the right hand column.
- Click the ‘+’ and and select Create Collection from the ‘pop-up’ box.
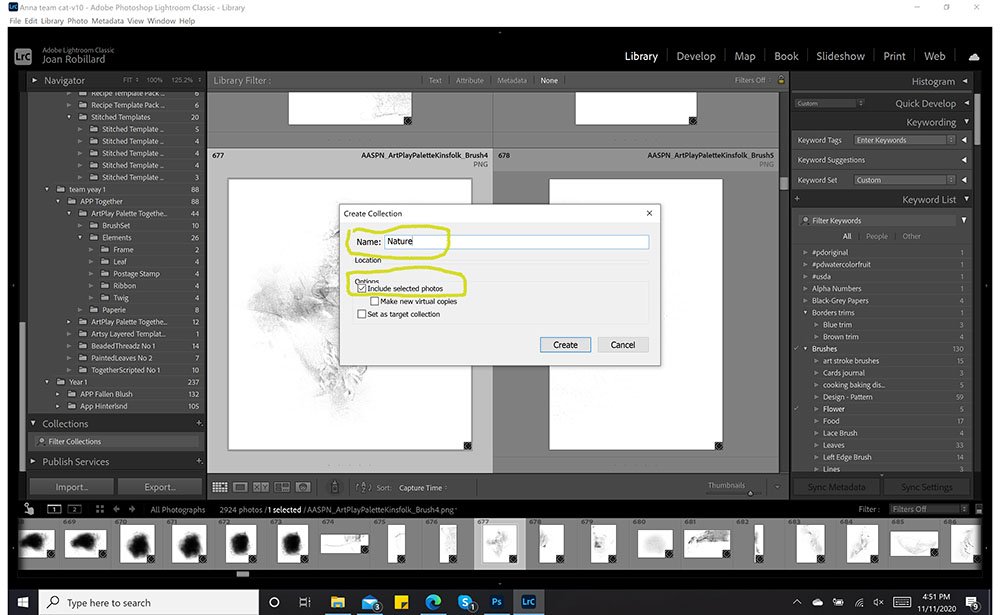
- Type the name of your collection in the first box.
- If you have selected images (s) you want to include in this collection, check the box in front of Include Selected photo(s).
- To add photos after a collection has been created, select the images you want to include in the collection.
- If you are selecting consecutive photos, then click on the first photo, hold down the SHIFT button on your keyboard, and click on the last photo to select all images.
- To randomly select images, then click on the first and then CTRL/CMD + Click on each photo that you want to include.
- Once you have selected you photos, drag them to the collection.
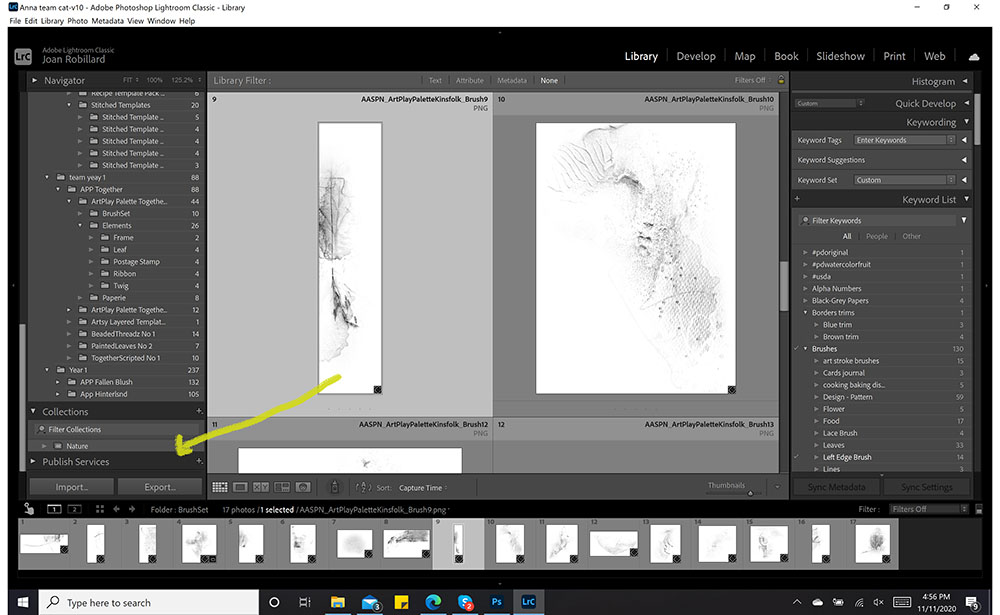
- You can choose a collection as a ‘Target‘ image, as shown with my ‘Nature Collection.’
- When you set up your collection, check the box for Set as Target Collection.
- You can also right-click on the name of the collection and select Set as Target Collection.
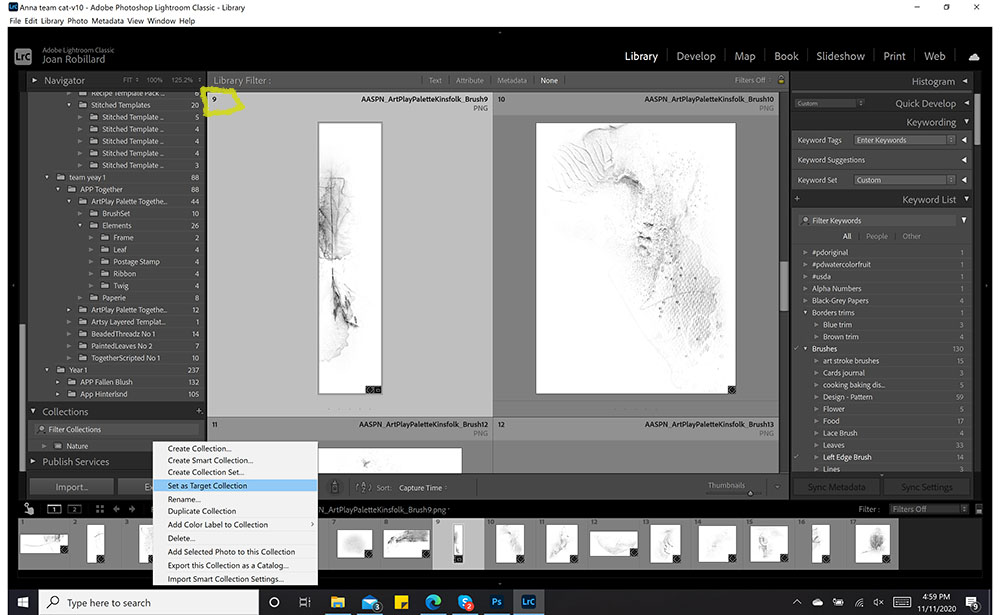
- Once you have set-up a Target Collection, you can add images to the collection by clicking on the ‘dot’ in the upper right hand corner.
- Note that this appears when you run your mouse over the image.
- Clicking the ‘dot’ automatically adds it to the collection.
Summary
Add keywords to your photos and digital assets to make them easier to locate.
- Download DigitalART supplies and photos to your computer.
- Import these digital assets into your Adobe Lightroom catalog.
- Add Keywords to assist in locating photographs or digital designs.
- Assign like items in a Collection to better organize.
See also:
Coming Next:
- In the next installment, I will share how to edit your photos in Lightroom.
And if you enjoyed this Find Photos and Digital Assets using Adobe Lightroom post, let us know what other tutorials you’d like to see.
Fabulous tutorial Joan thanks so much!
Agreed!