
Today, Joan Robillard is sharing guidance on Adobe Lightroom Photo Organization.
This tutorial is demonstrated in Lightroom Classic CC but instructions may also apply to other versions of the program.
Adobe Lightroom Photo Organization
Introduction
In this tutorial you will learn how to:
- Create a Catalog in Adobe Lightroom Classic CC.
- Learn to import photos from your smart phone, Camera, or a memory card to a Library.
- Back-up your Lightroom Catalog.
1. Open Lightroom Classic CC
Double Click on the Lightroom Classic CC icon on your desktop to launch the software and get acquainted with the program.
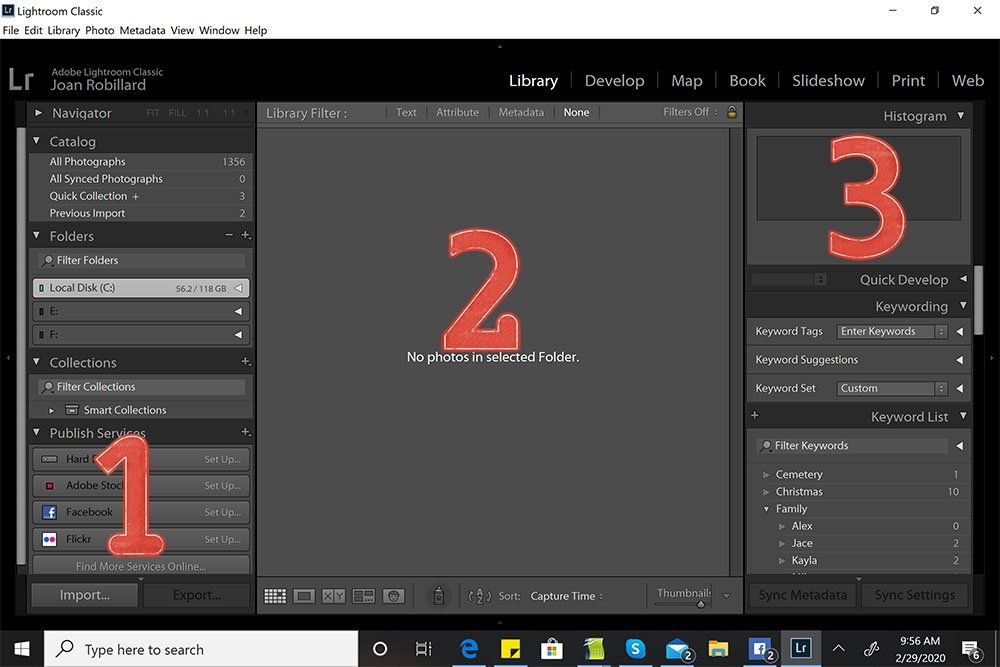
- Notice the seven icons listed across the bar on the left side.
- These are Library, Develop, Map, Book, Slideshow, Print and Web.
- In this tutorial we will work with Library ONLY.
- The Library enables you to see previews of your photos.
Note. The three columns:
- The first column displays the folders containing the photos which you have imported.
- The middle column shows the previews of your photos.
- The last column includes technical information about the photos such as Histogram, Key Words and Metadata.
 2. Create a New Catalog
Create a Catalog to keep and view previews of you photos.
- This enables you to edit the pictures in Develop mode within Lightroom, Photoshop, or use them in your photo artistry and scrapbooking pages.
Note. You can have MORE than one Catalog – I have 3 different Catalogs for every day photos, scanned heritage images and [aalogo] DigitalART supplies
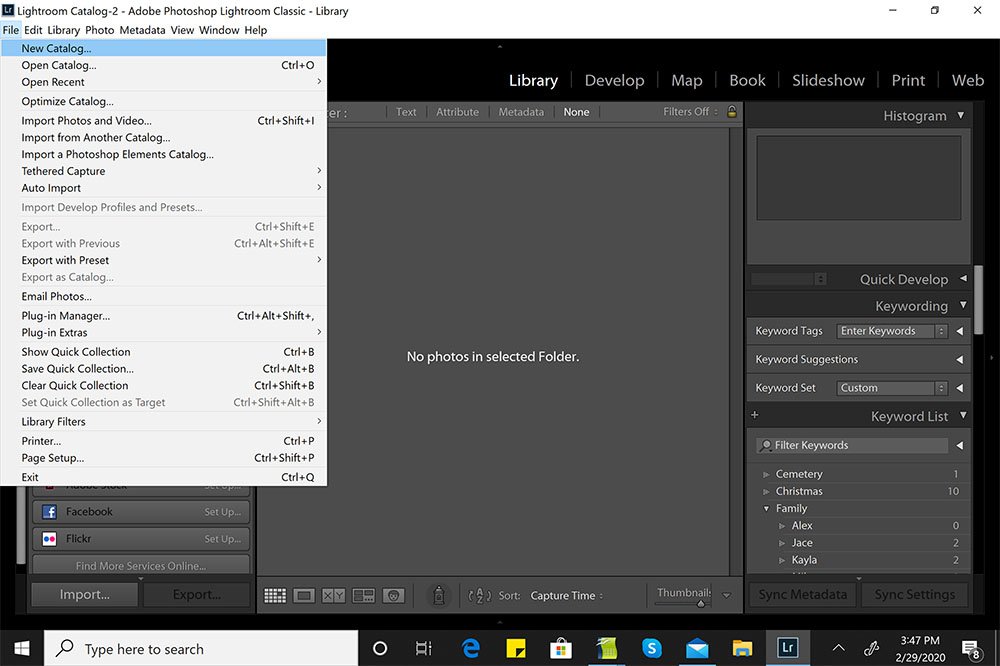
- Click on File>New Catalog
- When the dialog box opens, navigate to where you save your pictures.
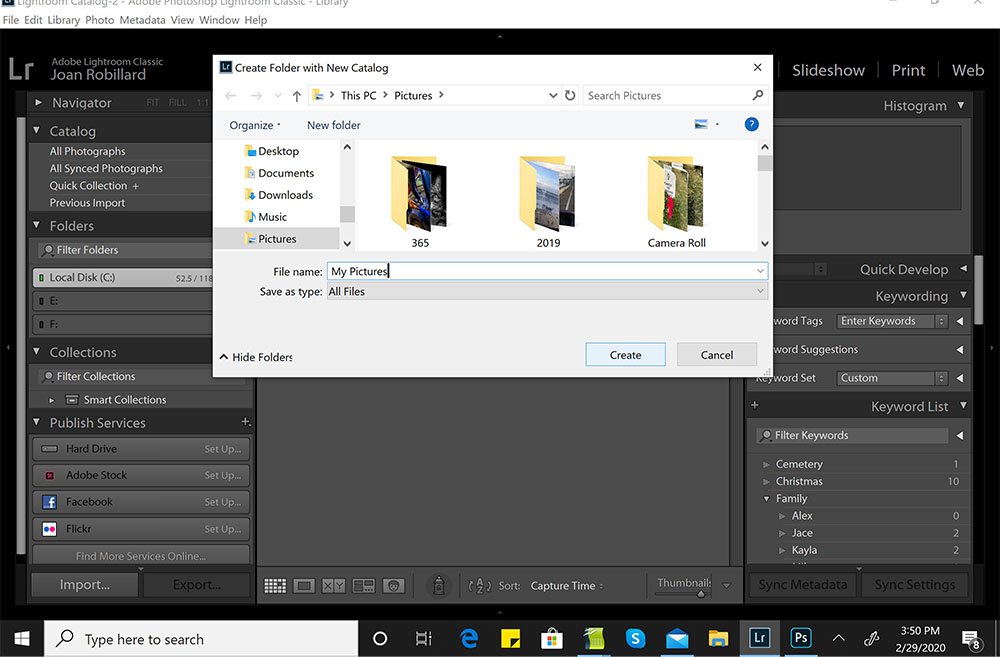
- Type in a name for your Catalog, such as My Pictures.
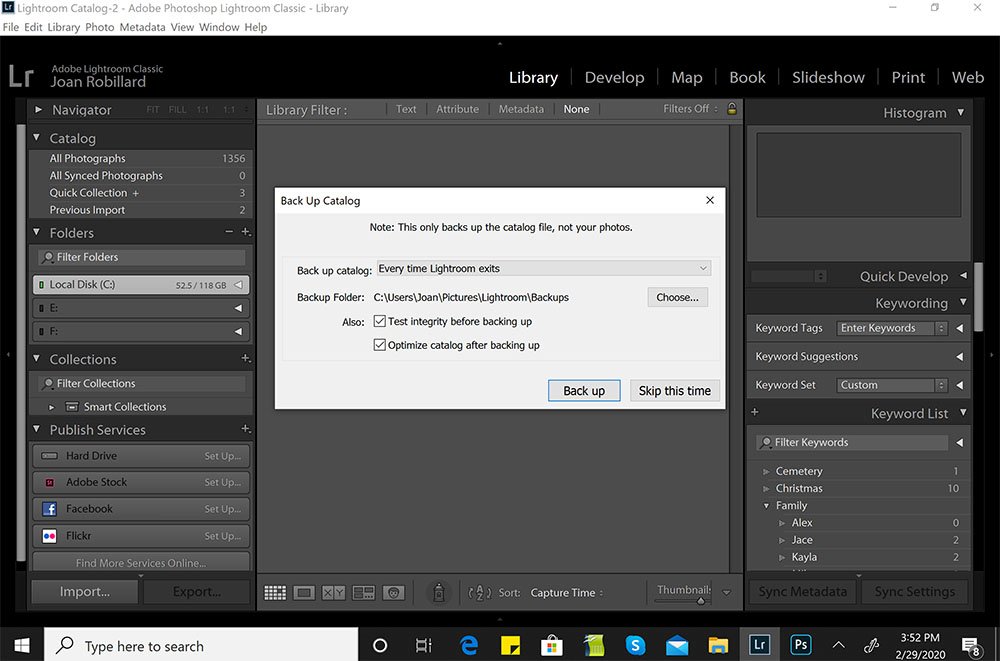
- The Backup Dialog box will pop up/open.
- Select when you want to back-up the Catalog.
Note. You will be backing up the your Lightroom Catalog and NOT you pictures.
 3. Import Photos
Create previews of photos from your device in Adobe Lightroom.
- When you import photos into Lightroom you are NOT moving the photos.
- You are creating previews that you can non-destructively edit, import to Photoshop or post on Social Media.
- Original photos will remain in their saved location on your computer.
Note. The instructions below describe how to access photos from your Camera card, but steps are similar for smart devices and cameras.
- Insert your card into the computer or connect your camera or cellphone.
- You may need to enter a password to allow connection..
- Click on the Import at the bottom on the left hand column.
- Lightroom should automatically connect to your photo card or camera device
- Select to access the photos (from my Nikon card).
- Hightlight Copy and New Photos at the top of the middle column.
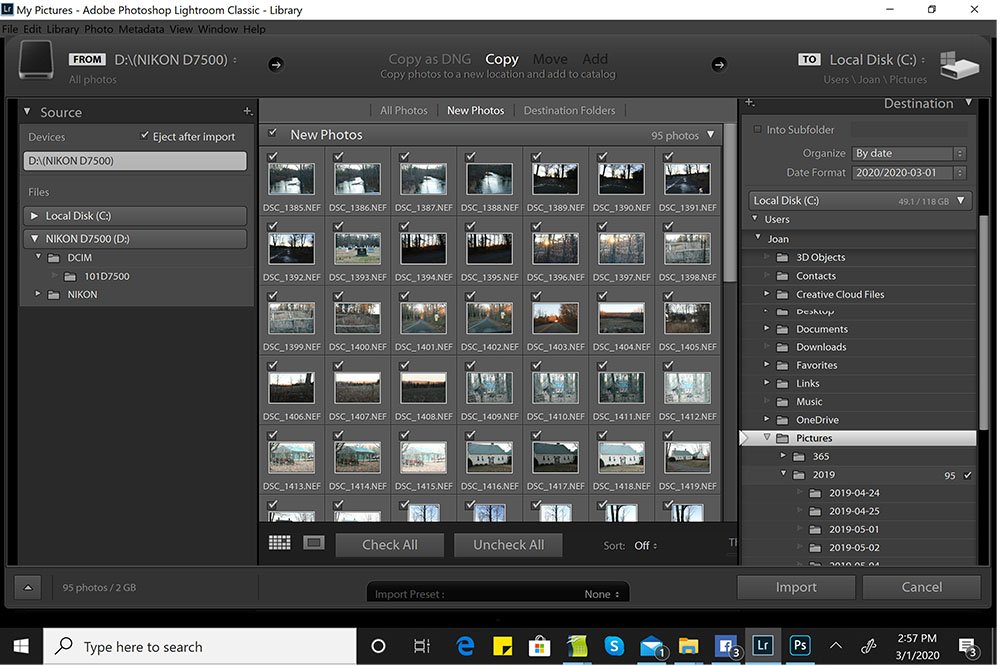
- Notice the ‘Check Mark’ in the upper left corner of each photo.
- Click on the ‘Check Mark’ to deselect from the import process.
- This enables you to be selective with the photos you wish to include.
- Click on the arrow next to expand your options under File Handling.
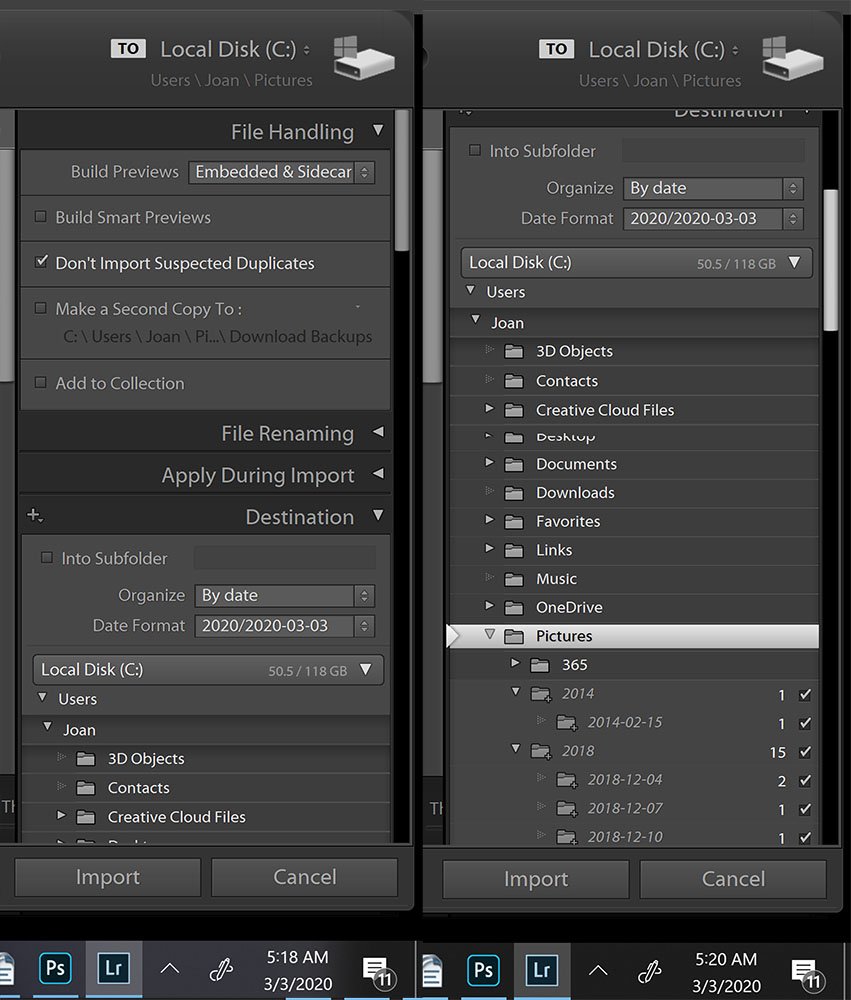
- Make a selection from the Build Previews drop-down menu – I suggest that you begin with Standard for your handling of files.
- This is the image you will see and work on in Lightroom.
- You can edit these previews in the Develop Module and your edits will be non-destructive.
Note. If you choose to bring your photos into a program like Photoshop from Lightroom, you can apply any adjustments at that time.
- Leave Build Smart Previews unselected.
- Check Don’t import Suspected Duplicates.
- Check Into Sub-folder and then type in a name in the box that follows to use a named folder – I skip this and go to Organize by date and choose the date format 2020/2020-03-01 which will create a folder for each year and a sub-folder for each date of the photos.
- Choose Into One Folder if you have folders into which you save photos (rather than by date.)
- You should now see your files listed.
- Click on the folder into which you want import your photos – I have mine in the folder Pictures and have sub-folders for year and dates of photos.
- Now click on Import.
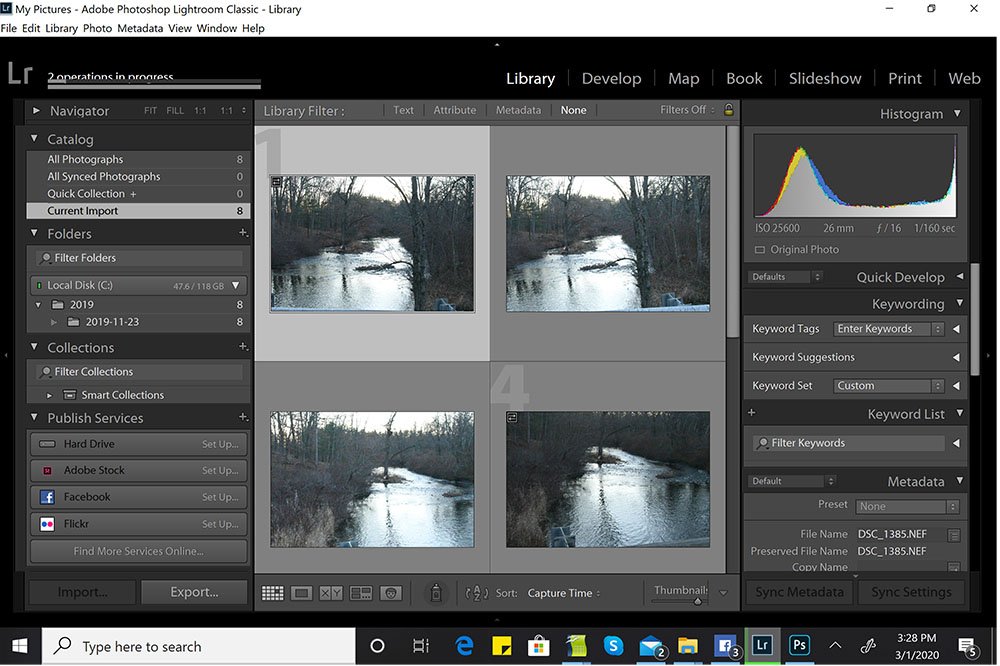
- You will be taken back into the Library Module.
- See a progress bar in top less and view photos appear in the middle column.
4. Back-Up Lightroom Catalog
Close Lightroom and back up your Lightroom Catalog.
- Click on File and then Exit.
- A dialogue box will appear and ask if you want to leave Lightroom.
- Select Yes.
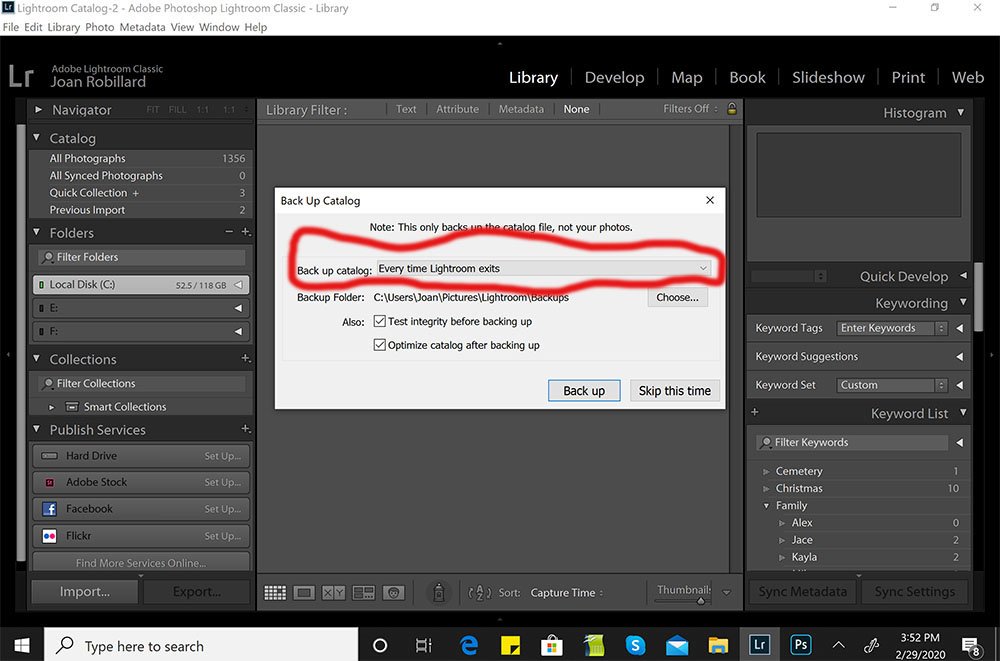
- Notice the Backup Catalog option on the first line in the box which enables you to change how often you back up your catalog.
- Backup Folder on the next line allows you to designate where you want your catalog saved.
- Leave the next two boxes checked.
- Click on Back Up. (See Back up screen above)
Summary
You have learned some of the basics of Lightroom.
- Open Lightroom and become familiar with areas in the Library.
- Create a new Catalog to view your photos.
- Back-up your Catalog.
WE ALSO INVITE YOU TO:
- Create your own Catalog in Adobe Lightroom
- Read Photo Book Project Prep in Lightroom
COMING SOON
- Learn how to import your photos already on your computer.
- Create a Catalog for your [aalogo] DigitalART supplies.
- Add Keywords.
- Place images in Collections for easier searching.
- Edit your photos in Lightroom.
Thanks for the tutorial, Joan! I do most of my photo editing in Light Room but use a different system of organization. Will look this over more closely and give it a go!