
Today, Creative Team Member, Dale is sharing one of her approaches to creating artistic images using Anna Aspnes Designs.
Follow this tutorial in Adobe Photoshop and Apps on the iPad. You may some of these ideas in other photo editing programs that support layers.
Dancing Between Devices
Moving your unfinished image between different devices will help you loosen up your artistry and discover unusual approaches.
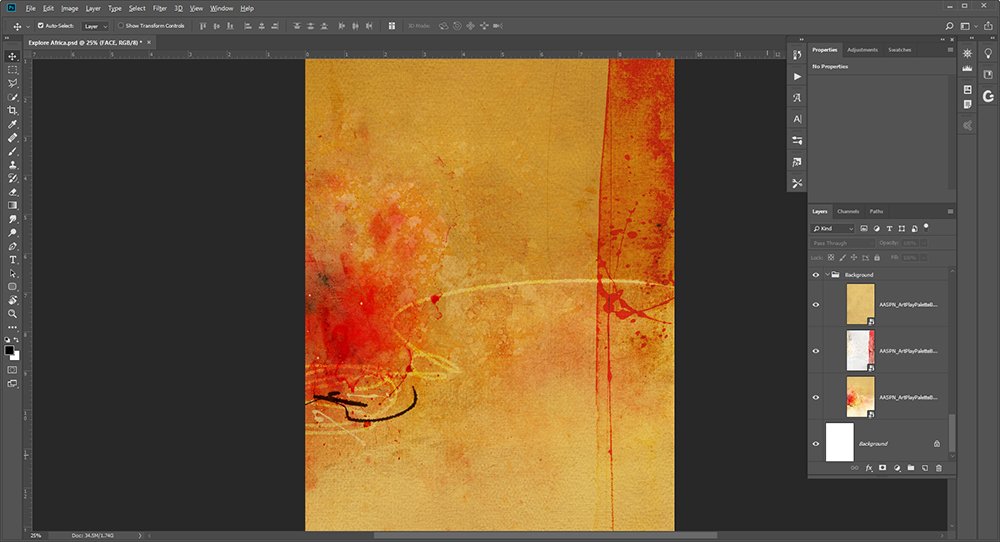
 1. Create a Background
You will learn to establish a firm base on which to begin.
- Use one or more Artsy Papers or Solid Papers of your choice to create a background.
- Blend your papers together using either the Gradient Tool in Photoshop, one of the many Brushes, or any of the FotoBlendz Clipping Masks.
Note/Tip. Creating numerous backgrounds in advance will give you inspiration to start a new piece of art when you are feeling uninspired.
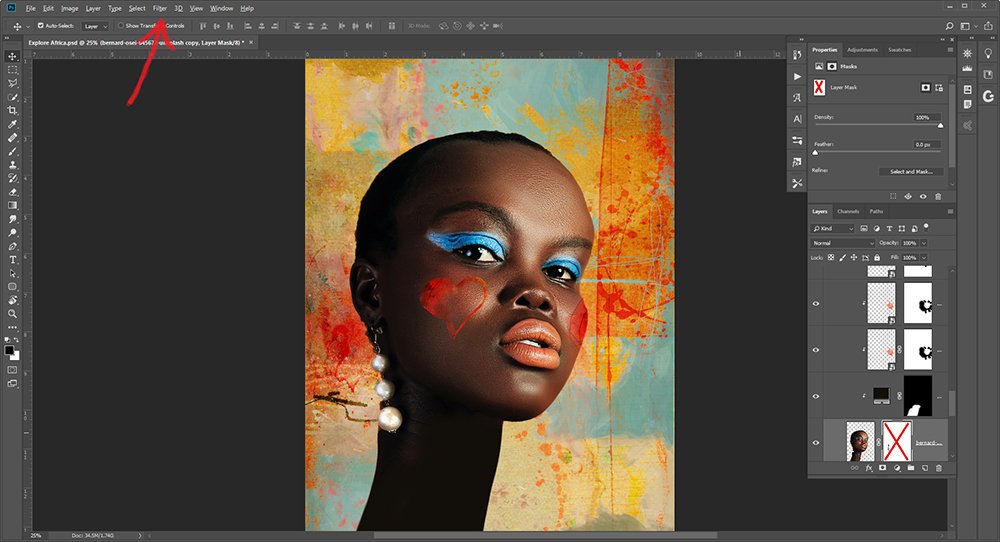
 2. Add your Photo to a Layout
Discover how to use your images in an unusual way.
- Choose an image with a strong focal subject e.g. a house, an animal or a person.
- Extract the subject from the background using the Quick Selection Tools from the Tools Panel in Photoshop/Elements.
- Note that your extraction does not have to be perfect.
- Use the Liquify Tool (Filter> Liquify) to distort your image to some degree (Photoshop ONLY) e. g. any of the facial features or the shape of the head.
- On this layout, the neck of the woman was elongated.
Note/Tip. When using the Liquify Tool ensure the image you want to distort is selected in the Layers Panel. You can have a lot of fun using this tool!
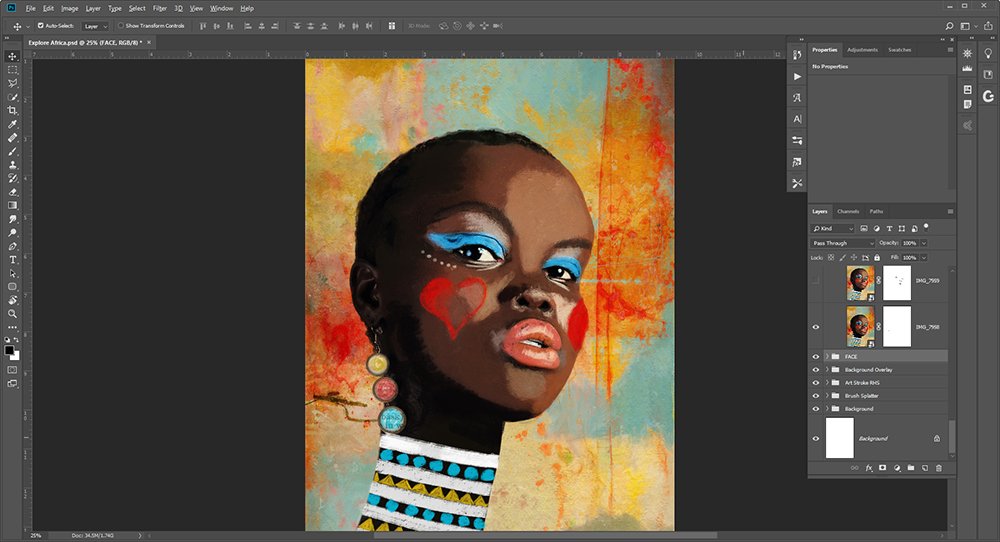
 3. Embellish Your Subject and Background
Give your subject some ‘make-up’ or decoration will make your image unique and personal.
- Apply any Tools, Elements or Brushes to embellish your subject.
- Use a previously created background as an overlay and apply a Blending Mode in Photoshop/Elements to blend the two backgrounds.
- Apply a Layer Mask and use Brushes to mask areas as preferred.
- Make your background more interesting using elements such as ArtStrokes, Brushes and Tools.
- Save your layout in BOTH .psd and .jpg format.
- Import the .jpg version of your image into Procreate on your iPad.
- Paint over the layout using one of the many Brushes to create a more painted look and/or to decorate your subject further.
- For example you can enhance any make-up worn by your subject by making it brighter or changing the color completely.
Note. Procreate is an App from the Apple store for iPad and the iPhone (Procreate Pocket) with layered file capability.
Tip. There is quite a learning curve, but it is extremely powerful and a great asset to you and your artistry. You can find many tutorials on-line.
 4. Stack Your Apps
Using more than one App in your creation will help you develop your own unique style.
- Save your image painted in Procreate to your Camera Roll.
- Import the photo into another ‘Painting App’ of your choice such as iColorama, PaintCan, Metabrush, Repix, Brushstroke or Impresso.
- Save different versions of the ‘painted’ photo to your iPhone Camera Roll.
- Move the painted Procreate image together with the other ‘painted’ versions of the image back to your PC or Mac.
- Open the original .psd file, and import whichever painted versions of the image you find most appealing, into Photoshop.
- Now the fun begins! Start blending, masking and changing the opacity of the layers to yield a result you are happy with.
Note/Tip. This part of the process takes some time, experimenting and practice. Be patient with yourself!
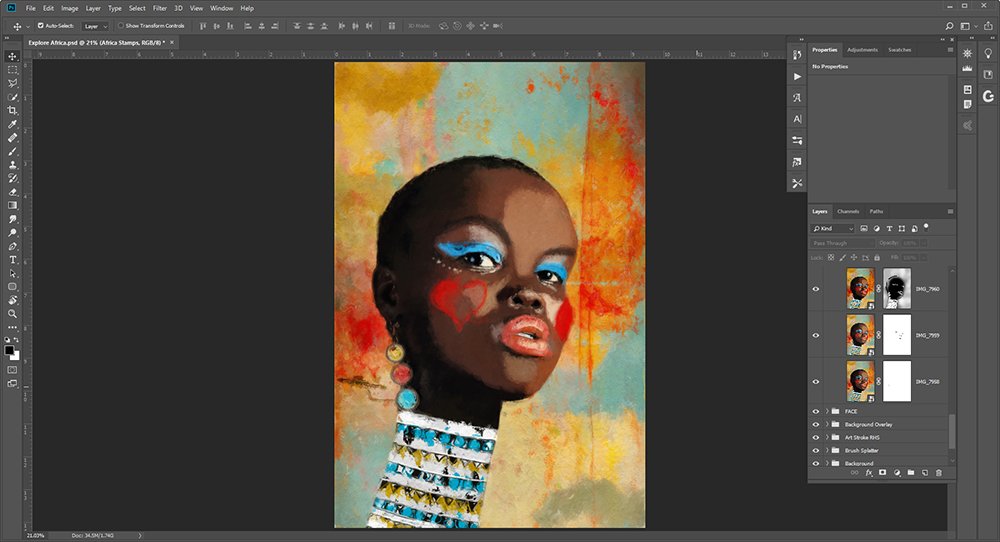 5. Embellish
Add more artsy elements to your background to augment the depth and interest in your design.
- Add a variety of Brushes, Splatters, Transfers and/or Overlays to your layout design to build visual interest.
- Painting is akin to many layers on a canvas to make it dynamic and increase complexity – but without the mess and drying time!
- Conceal areas of the image via masking using a Layer Mask and Brushes.
Note/Tip.: Never be afraid to change the Blending Mode of Transfers, or to change the color of any Brushes you use, to blend them into your background seamlessly.
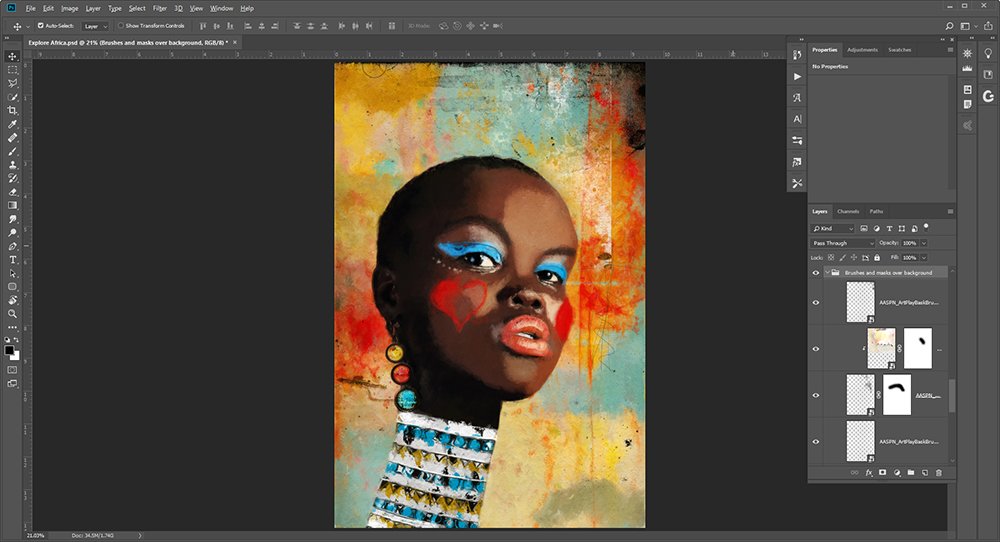 6. Tell the Story
Add embellishments to support the story of your artistry.
- Add a Shape across the eyes of your subject to create a focal point and draw the viewer into the design.
- Adjust with the Opacity, Blending Mode and Color of this layer as preferred
- Add an overlay using an Artsy Paper to subtly ‘grunge up’ and distress the image, frame your subject and unify the elements in your design
- Add an Edge Overlay add a border and contain or frame your image.
- Add a Color Overlay to change the tone and control the mood to your image.
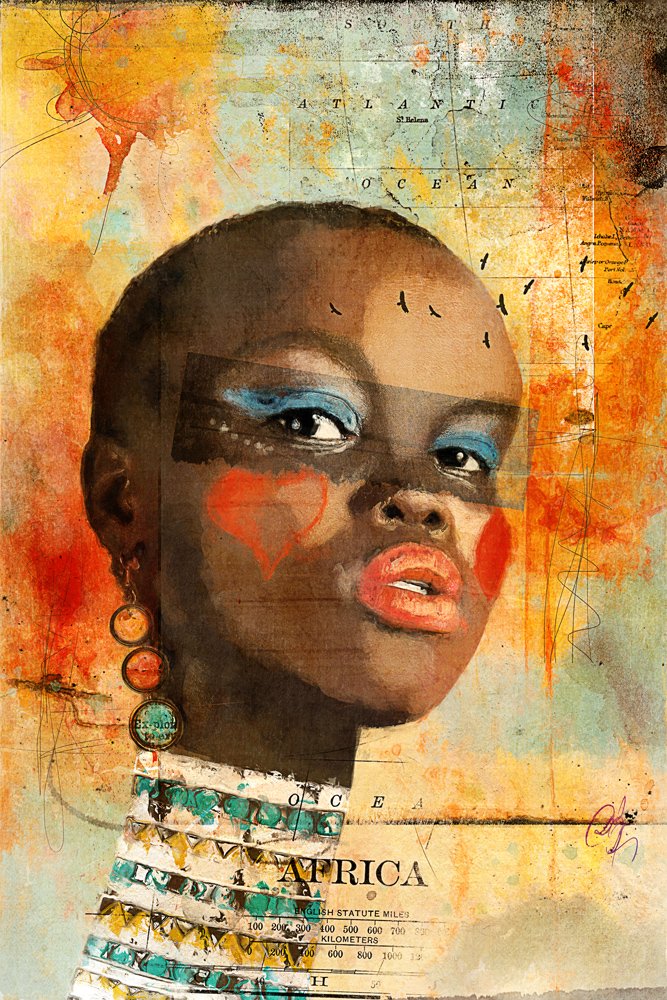
Note. Brads were used to overlay where the earrings are in this image. The brad on the bottom part of the earring says ‘explore’.
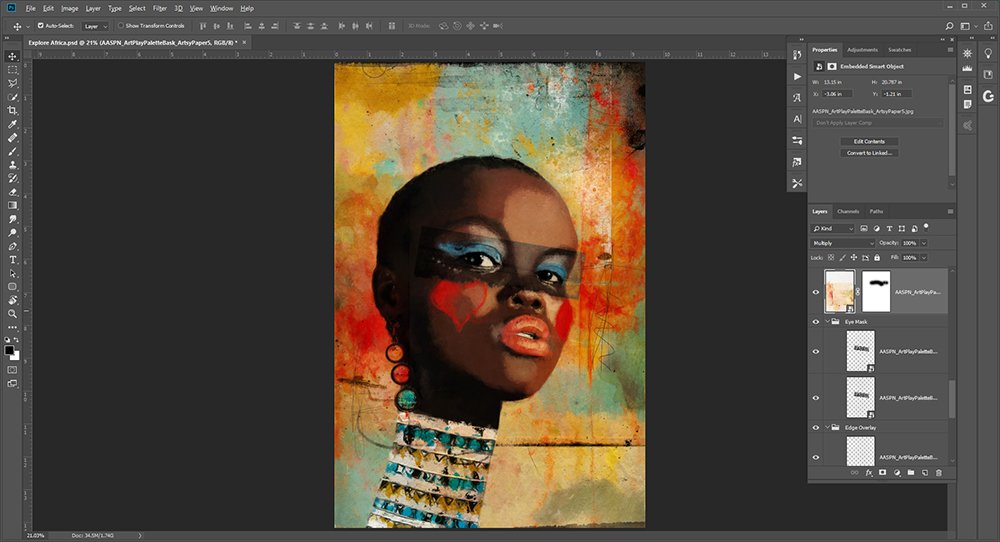 7. Finishing Layers
In these last steps you will decide how you want to present your final image.
- Add Brushes to help you bring your story to life – Travel Africa No. 1 Brushes were added to the image.
- Add ArtsyTransfers to highlight your image – Notice the ArtsyTransfer in the top left hand corner to suggest the sunshine in Africa.
- Use a Levels Adjustment Layer (Layer> New Adjustment Layer> Levels) to brighten your image if preferred.
- Overlay as many texture layers as you would like to in order to unify the image changing the BLEND MODE and/or OPACITY of each layer where necessary.
- Apply Texture layers via the use of Solid/Artsy Papers or photos of concrete, walls, wood, fabric etc.
Note. A Bird brush was also used to convey the feeling of long-distance travel.
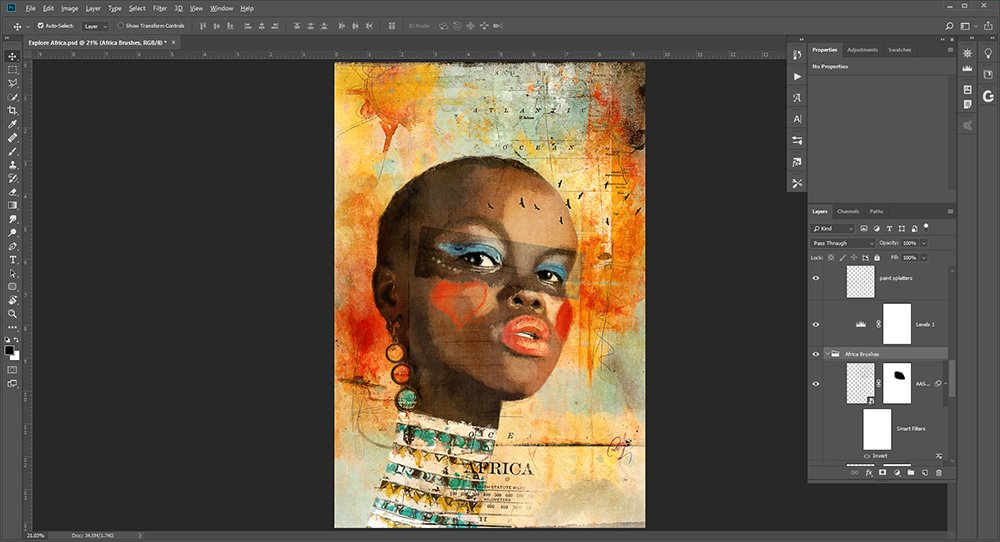 Summary
Moving between Photoshop (or your editing program of choice) and an App on your iPhone or Android can add interest to your layout design and process.
- It can initially be very intimidating, confusing and frustrating but hang in there!
- As with most things, the more you practice and experiment, the more familiar you will become with each App.
- You will finally develop a unique dance and rhythm between your devices.
Give yourself permission to experiment and play.
This will:
- Add more tools to your creative arsenal.
- Refresh your layout design process if you are feeling ‘stuck’.
- Give you the chance to discover new techniques and create ‘happy accidents’.
DigitalART Supplies
- ArtPlay Palette Bask (Solid Paper #1, Artsy Paper #2, 3, 5, 6, Edge Overlay, ArtStroke #2, Transfer #5, Brads #3, 5)
- ArtPlay Palette Bask BrushSet (Brush #9, 10, 11, 14)
- ArtPlay Palette Explore (Brad)
- Travel Africa No. 1 (Brush #1, 6)
- WaterColor Hearts No. 1 (Brush #5)
Love the title of your excellent tutorial, Dale! I look forward to experimenting with some new apps and ‘dancing’ between devices! Thanks for sharing your artistic experience with us.
Many thanks to Dale and Anna for sharing this with us. Although I jump between apps, I am still very much a procreate virgin and looking at Dale’s gorgeous and unique creations always urges me to jump on board this app and learn it. Seeing this today has inspired me and i am making a point to go and jump onboard that learning curve I have been avoiding. Dale has such an individual creative voice in this genre and constantly evolving, which is not only a joy to witness but a huge inspiration to me and I am sure, many others. Anna, your design pieces are so sophisticated, I adore them and using them as well from Kaizen. Thanks to both of you!!
I need to do the same Vicki. Nothing like having a team member to inspire you 🙂
Thank you so so very much for your beautiful comment Viki! I am delighted that you are going to jump into Procreate more – the possibilities are endless and I can tell you I still have a long way to go! The joy of Procreate is that with just a little venture into it, you can make the world of difference to an image and create wonderful, unique art. Your photography has always been such an inspiration to me and I am looking forward to us going on a photography adventure together! Cannot wait to see what you create! xx
Thank you so much for your kind words Marnie, and I am so happy you are willing to go and have a play! It really is so much fun and the results are sometimes way beyond your wildest dreams! xx
This was a great tutorial. I can’t wait to try some of the ideas- especially with the backgrounds. I really like the idea of creating custom backgrounds and saving them for future use. That could be a who,e class in and of it’s self.
Enjoy Nancy and I’ll have a think about a class.