
Today, Creative Team Member, Viv, is sharing how to Dreamy Photo Effect using Smart Objects and Filters
This tutorial is for Photoshop users ONLY.
Dreamy Photo Effect using Smart Objects
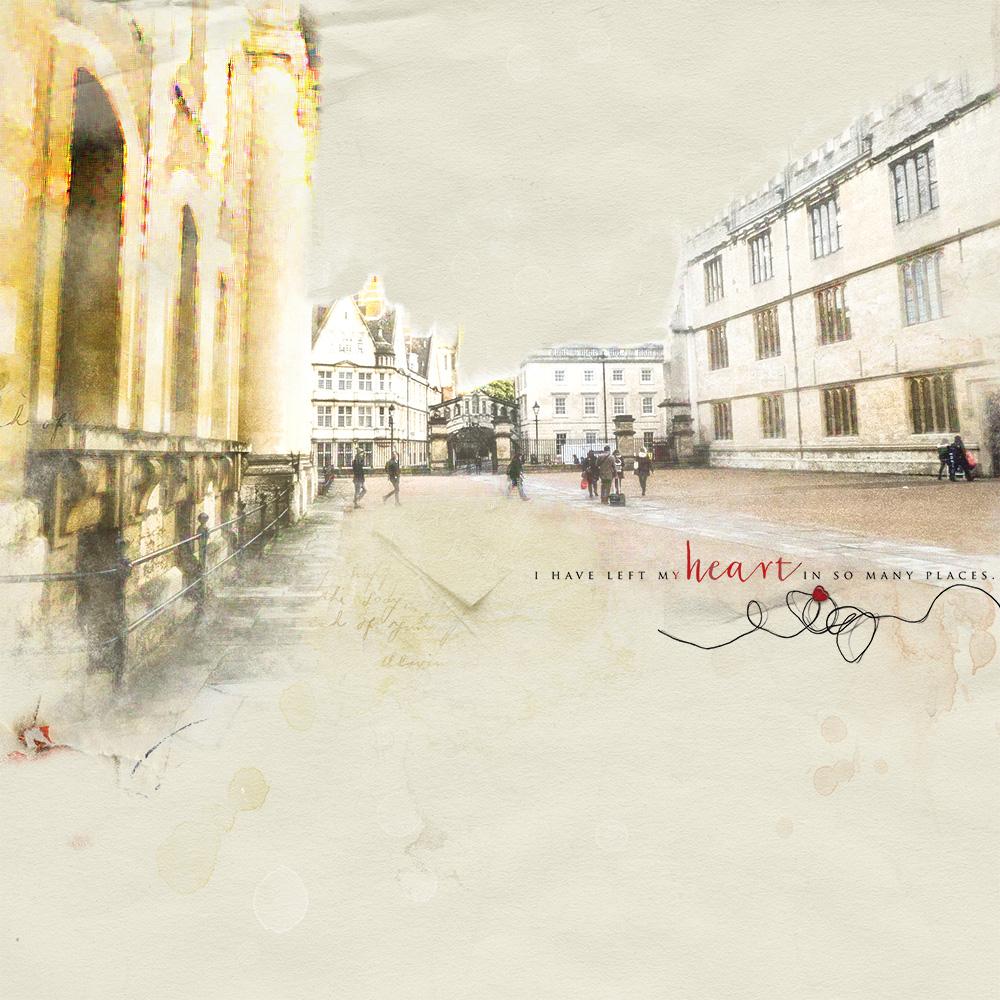
LEARN HOW TO TRANSFORM A PHOTO INTO A DREAMY CITYSCAPE USING SMART OBJECTS AND THE FILTER GALLERY.
Note. This dreamy landscape effect works particularly well for architectural photos or those with colorful points of interest in a landscape format.
1. Understand Smart Objects
Smart Objects are layers that contain image data from images in Photoshop.
- The image source content is preserved with all the original characteristics.
- This enables you to perform nondestructive editing to the layer.
- You can edit the effects at any time in your creative process.
See Work with Smart Objects for further guidance.
2. Create a Smart Object
Convert a photo into a Smart Object.
- Open your photo into Photoshop work space (File> Open).
- Resize the image to fit your chosen background digital paper using the Transform controls – I wanted mine to completely cover the width of the page.
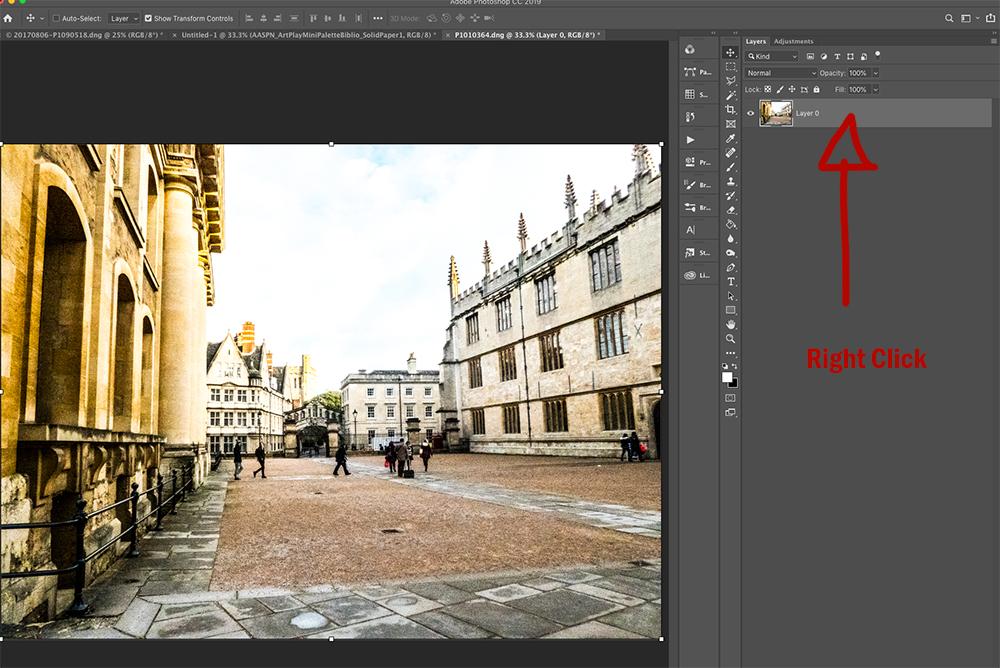
- Convert your photo into a Smart Object by right clicking on photo layer in the Layers Panel.
- Select Convert to Smart Object option from the fly-out menu.
- Learn more about Smart Objects.
Note. I duplicated my image three more times, turning off the visibility of the bottom layer. Name this layer ‘Keep’ as a ‘back-up’ just in case I need to go back to the original.
3. Apply a Filter
Apply the Paint Daubs filter to your photo smart object.
- Turn on the visibility of the 2nd photo copy layer.
- Rename the layer Paint Daubs by right clicking on the layer label and typing in a new name.
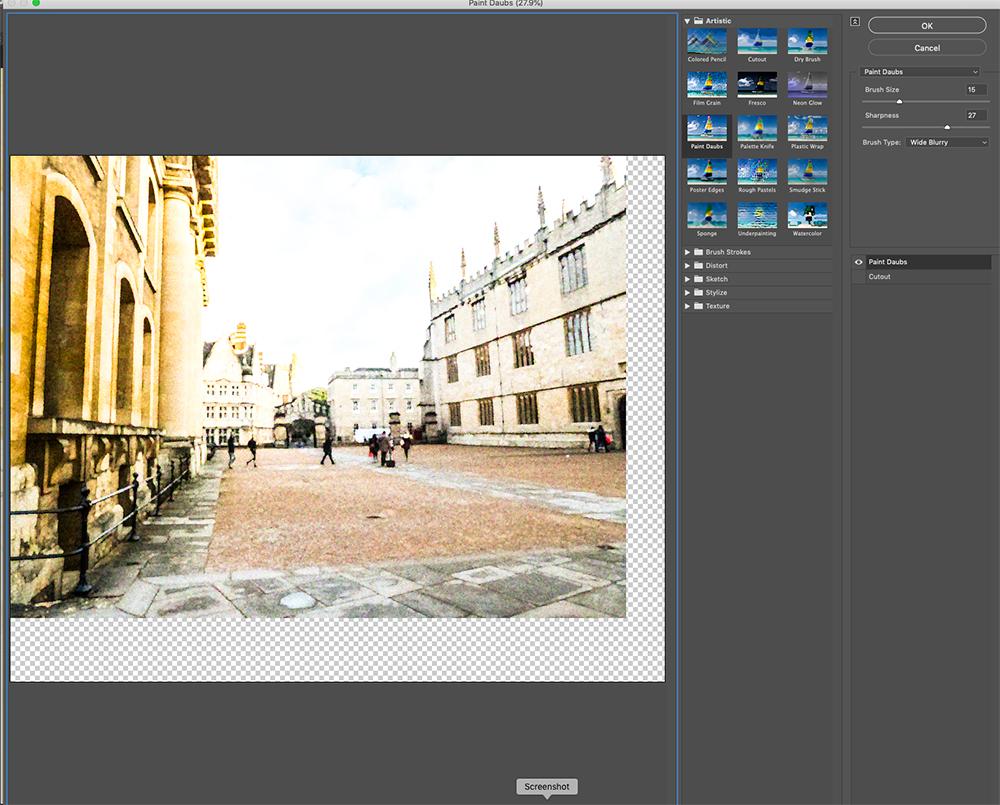
- Go to Filter> Filter Gallery to begin applying filters to your photo.
- Click on the black downward facing arrow next to the Artistic folder to view your options.
- Select Paint Daubs.
- Move the sliders o to the right of the photo to yield a blurry painterly effect e.g. Brush Size 15, Sharpness 27 and Brush Type Wide Blurry.
- Click OK to apply the filter to your photo.
Note. The smart object enables you to adjust the individual settings.
4. Repeat Filter Process
Use the same process changing the type of Filter.
- Turn on the visibility of the 3rd photo copy layer.
- Rename the layer Cutout.
- Go back to the Filter Gallery and apply the Cutout filter from the Artistic folder.
- Try Levels 8, Edge Simplicity 8 and Edge Fidelity 3 or experiment as preferred.
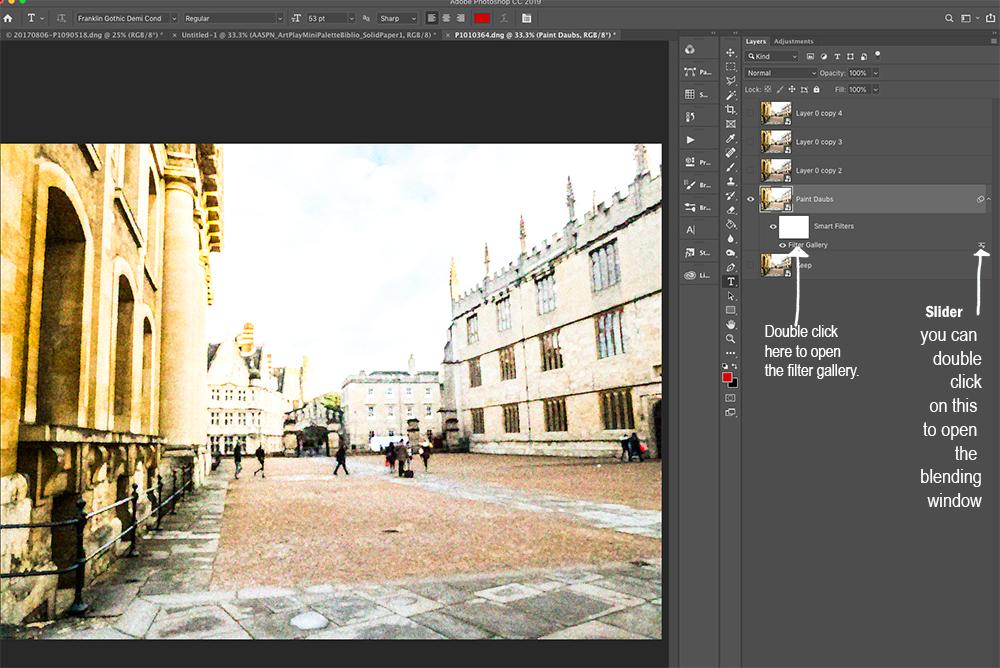
Note. You can double click on ‘Filter Gallery,’ which has been applied to the layer, to open and adjust your filter settings (see image below.)
5. Blend your Photo
Use an Inverted Mask to blend your manipulated photo.
- Link all the photo layers together by selecting and applying the ‘paperclip’ icon from the Layers Panel.
- Move the photo layers onto a New Layout using the Move Tool from the Tools Panel.
- Turn off the visibility of all the layers excluding the Paint Daubs layer.
- Apply an Inverted Mask and use an AnnaBlendz Artsy blending brush with the Paint Brush Tool at approx. 40% Opacity to reveal your photo.
Tip. Increase the Opacity levels on areas you want to highlight more such as bright colors.
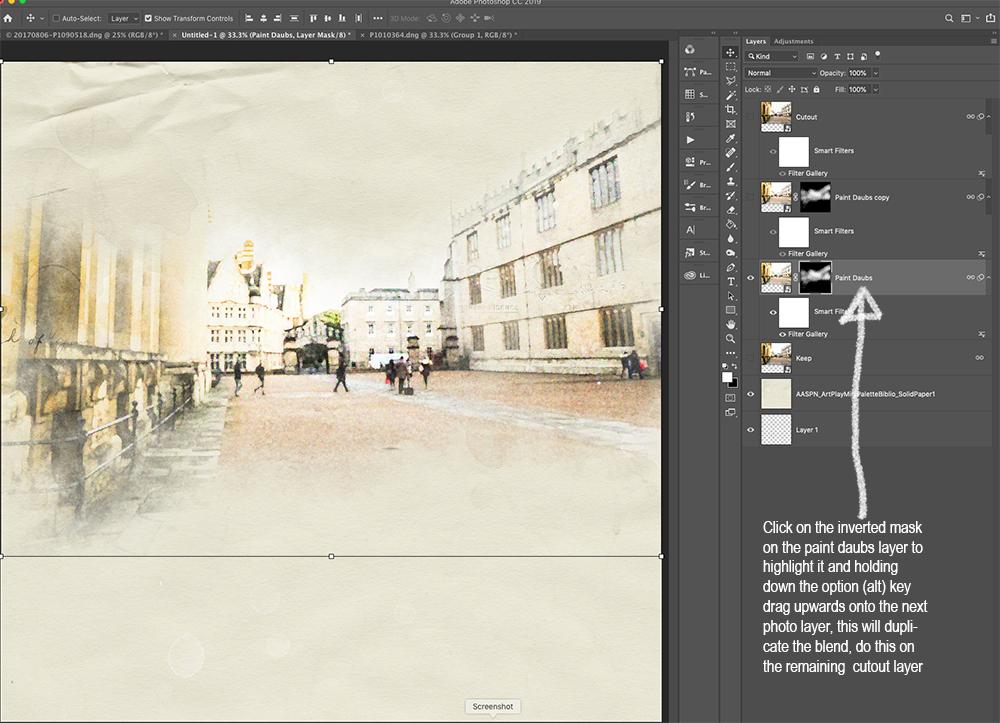
6. Duplicate Mask Effect
Apply the Inverted Mask to another layer.
- Click on the inverted mask applied to the Paint Daubs layer to highlight.
- Hold down the OPT/ALT button on your keyboard.
- Drag the Layer Mask up the Layers Panel and release onto the Cutout photo layer.
Note. This will duplicate the blending effect to this layer.
7. Make Final Adjustments
Modify the effect using Levels and Blending Modes.
- Adjust the Levels (Image>Adjustments> Levels) for each layer to modify the softness in the effect
- Apply Blending Modes to the layers.
Note. A Lighten Blending Mode was applied to the Paint Daub layer.
- Double click on the slider to open the Blending Mode for the Filter.
- Change the the Blending Mode to Lighten.
- Duplicate the layer as preferred by dragging down to New Layer icon in the Layers Panel.
Tip. The more you experiment with the sliders, the greater the effect.
- Try clipping a Levels Adjustment Layer was also added to the Cutout photo layer.
- This will lighten the dreamy photo effect.
- Add ArtsyStain and Texture brushes to inject visual interest into your design.
- Layer Transfers from ArtPlay MiniPalette Biblio.
Summary
Use Smart Objects and Filters to edit and manipulate your photos.
- Learn about Smart Objects.
- Convert your photo into a Smart Object to allow for editable Filter effects.
- Create a duplicate photo layer for each Filter.
- Apply different Filters from the Filter Gallery.
- Adjust the effect to preference by moving the sliders for each Filter.
- Blend your edited photo using an Inverted Mask and AnnaBlendz Brushes.
- Enhance the Dreamy Photo effect using Levels and Blending Modes.
TRY THIS: Experiment with different Filters.
DigitalART Supply List
- ArtPlay MiniPalette Biblio
- Travel WordART No. 3
- Artsy Stains No. 8
- Beaded Threadz No. 1
- UrbanThreadz No. 16
- AnnaBlendz Artsy No. 8 (#6)
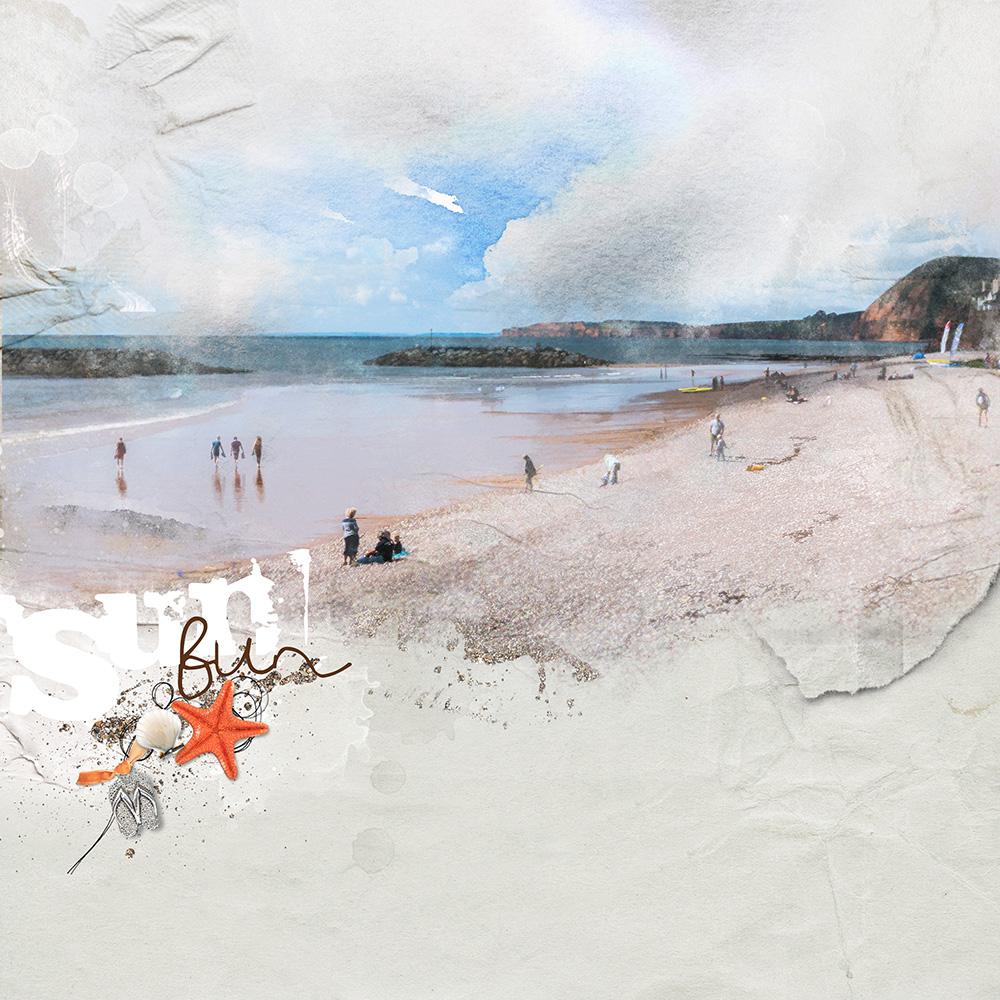
Another example layout using the same dreamy photo effect.
Video PLEASE…only way I can wade my way through!
Thanks anyhow…appreciate your efforts.
Got half-way through then had to give up…bain dead!
Hi Elaine, thanks for the feedback. Unfortunately team members are unable to create videos due to software requirements. Anna
Lots of helpful guidance for preserving the integrity of the image while creating this dreamy effect! Appreciate the thoroughness of the tutorial!